
Crochet Christmas baubles
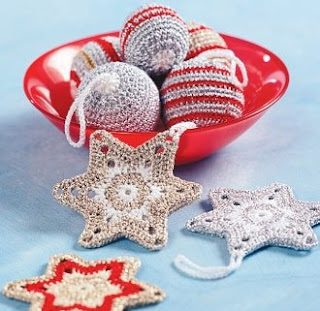
Crochet baubles
Finished sizes: about 13cm in circumference (small bauble); about 16cm in circumference (large bauble)
Gather your supplies
Pellicano Perle No 5 mercersied cotton in White 7901 and Ecru 0608; Arista in Red 318, Soft Gold 303, Silver 301 and Soft White Gold 302; 2.00mm crochet hook; tapestry needle; scissors; 38mm and 50mm polystyrene balls
Tension: Check your tension before you start. If your tension sample is larger than recommended, use a slightly smaller hook. If your tension sample is smaller than recommended, use a slightly larger hook. Small bauble: Crochet first 3 rnds of pattern. Sample should measure about 3.3cm in diameter. Large bauble: Crochet first 4 rnds of pattern. Sample should measure 4.5cm in diameter.
Notes: When working on a new round, always crochet over thread ends. This saves time on threading ends in later. Tie a small knot at the end of Arista thread to prevent it from unravelling.
The beginning, 1st and 18th Rnds are all made using Pellicano. Rnds 2-17 are made using Arista. If you are making striped baubles, simply finish off thread at the end of the round and use another colour for the next round (join new thread to a stitch from previous round using a slipknot). The instructions will only tell you to finish off thread when changing from Pellicano to Arista thread but you may wish to finish off and swap colours at the end of any row.
Rounds 2, 3, 4, 15, 16 and 17 are made using htr stitches and therefore the stripes will be quite wide. Rounds 5, 6, 7, 8, 9, 10, 11, 12, 13 and 14 are made using dc stitches (if you would like your stripes to be even in width, work 2 rnds of dc stitches in the same colour to make the stripes similar in width to the htr stripes).
If you are choosing to continue crocheting in the same colour of Arista, disregard the 'joining a new colour' instructions.
Make sure when working the rounds that you do not crochet into the slip stitch from the end of the previous round.
Refer to crochet stitch diagrams and abbreviations by
clicking here
Here's how
Begin with Pellicano in colour of choice, make 5ch. Join with sl st to form a ring.
1st Rnd: 2ch (represents 1st htr), 11htr in ring, sl st in 2nd of 2ch from beg of rnd. Finish off Pellicano.
2nd Rnd: Using Arista thread in colour of choice, join thread to a htr of previous rnd using a slipknot. 2ch (represents 1st htr), htr in same st, 2htr in each htr to end, sl st in 2nd of 2ch from beg of rnd.
3rd Rnd: Using Arista in colour of choice, join thread to a htr of previous rnd using a slipknot. 2ch (represents 1st htr), 2htr in next htr, *htr in next htr, 2htr in next htr, (repeat from * to end of rnd), sl st in 2nd of 2ch from beg of rnd.
4th Rnd: Using Arista in colour of choice, join thread to a htr of previous rnd using a slipknot. Small bauble: 1ch (represents 1st dc), dc in each htr of the previous rnd, sl st in 1ch at beg of rnd. (36dc made in rnd, including counting the 1ch at beg as 1st dc).
Large bauble: 2ch, (represents 1st htr), htr in next htr, 2htr in next htr, *htr in next 2htr, 2htr in next htr, (repeat from * to end), sl st in 2nd of 2ch from beg of rnd (48htr in rnd, including counting the 2ch at beg as 1st htr).
5th, 6th 7th, 8th, 9th, 10th, 11th, 12th Rnds, small bauble only: Using Arista in colour of choice, join thread to a dc of previous rnd using a slipknot. 1ch (represents 1st dc), dc in each dc of the previous rnd, sl st in 1ch from beg of rnd. At the completion of the 12th rnd, insert the foam sphere into the crochet and begin crocheting rounds 13, 14 and 15 over the top of the foam sphere.
5th Rnd, large bauble: Using Arista in colour of choice, join thread to a htr of previous rnd using a slipknot. 1ch (represents 1st dc), dc in each htr of the previous rnd, sl st in 1ch at beg of rnd (48dc made in rnd, including counting the 1ch at beg as 1st dc).
6th, 7th, 8th, 9th, 10th, 11th, 12th, 13th and 14th Rnds, large bauble: Using Arista in colour of choice, join thread to a dc of previous rnd using a slipknot. 1ch (represents 1st dc), dc in each dc of the previous rnd, sl st in 1ch at beg of rnd. At the completion of the 14th rnd, insert the polystyrene ball into the crochet and begin crocheting the following rnds over the top of the ball.
Shaping top of baubles
Note: In the 13th Rnd of small bauble, the 15th Round of large bauble and in following rounds of each, make 2htr tog in a cl to decrease at top of bauble. (In 13th rnd of small bauble and 15th Rnd of large bauble, you will be crocheting into the dc stitches of the previous rnd. In following rnds, you will be crocheting into the htr stitches or htr cl stitches of the previous rnds).
To make 2htr tog in a cl to decrease: wrap thread around hook and insert hook into 1st stitch, wrap thread around hook and draw thread back through this stitch (there will be 3 loops on hook). Wrap thread around hook and insert hook into next stitch. Wrap thread around hook and draw thread back through this stitch (there will be 5 loops on hook). Wrap thread around hook and draw through all
5 loops on hook.
13th Rnd, small bauble only: Using Arista, join thread to a dc from previous rnd using a slipknot. 1ch, htr in next 2dc, *make next 2htr tog in a cl to decrease, htr in next dc, following the instructions above, repeat from * to end, sl st in 1st htr at beg of rnd.
14th Rnd, small bauble only: Using Arista, 1ch, htr in next st, *make next 2htr tog in a cl to decrease (repeat from * to end), sl st in 1st htr from beg of rnd (miss 1ch made at beg of rnd). Finish off Arista.
15th Rnd, small bauble only: Using Pellicano, join thread to the 1st htr from beg of previous rnd. 1ch, htr in next htr cl, *make next 2htr tog as a cl to decrease (repeat from * to end), sl st in htr at beg of rnd (miss 1ch made at beg of rnd). Finish off Pellicano. Follow instructions to make hanger.
15th Rnd, large bauble only: Using Arista, join thread to a dc from previous rnd using a slipknot. 1ch, htr in next dc, htr in next 2dc, *make next 2htr tog in a cl to decrease (following the instructions above), htr in next 2dc (repeat from * to end), miss 1ch from beg of rnd, sl st in 1st htr at beg of rnd.
16th Rnd, large bauble only: Using Arista, join thread to a stitch from previous rnd using a slipknot. (In this and following rounds you will sometimes be crocheting into htr stitches and sometimes crocheting into cluster stitches made in previous rnd. These instructions, therefore, ask you to crochet into the next st, rather than specify what that stitch will be. ) 1ch, htr in next 2st, *make next 2htr tog in a cl to decrease, htr in next st (repeat from * to end), miss 1ch made at beg of rnd, sl st in 1st htr at beg of rnd.
17th Rnd, large bauble only: Using Arista, 1ch, htr in next st, *make next 2htr tog in a cl to decrease (repeat from * to end), miss 1ch made at beg of rnd, sl st in 1st htr from beg of rnd. Finish off Arista.
18th Rnd, large bauble only: Using Pellicano, join thread to the 1st htr from beg of previous rnd. 1ch, htr in next htr cl, *make next 2htr tog as a cl to decrease (repeat from * to end), sl st in htr at beg of rnd (miss 1ch made at beg of rnd). Finish off Pellicano.
Hanger
Attach Pellicano to a stitch from the last rnd using a slipknot. Make 40ch, sl st in the top of the bauble in the last rnd. Finish off by weaving in all threads.


