Monday, September 29, 2008

Stocking Stuffer Idea - Cute Reindeers


Too Cute Reindeer Craft
I'm going to make these for the children I give to this year. I think they are so cute.


Materials needed:
Two standard-sized washcloths, tan and white
2 bars of bath-size soap
4 wiggle eyes
2 red pompoms
4 brown pipe cleaners
2 rubberbands
12 tiny jingle bells
Decorative cord or ribbon
Velvet ribbon for bow
Small bell for Rudy
Tacky glue
Blush make-up for cheeks


Directions:
1. Open washcloth and place it on the table with one corner facing you. This makes the washcloth a diamond shape.
2. Place the soap in the center of it.
3. Bring the corner facing you and the back corner up together. Roll the two corners backwards down to the top of the soap. <>4. Take the two side corners in your hands and bring together at the top this will form the ears.
Secure them together with a rubberband down next to the soap. Shape to resemble ears.
5. Fold one pipe cleaner in half and poke it between the ears and through the rubberband.
6. Cut another pipe cleaner in half and twist it around to make the antlers. Do this on both sides.
7. Now attach the tiny jingle bells through the ends of the antlers. Fold the pipe cleaners back to secure them on.
8. Tie a decorative ribbon, cord or bow around the bottom of the ears. The bow shown in the sample has a small bell attached.
9. Glue on pompom nose and wiggle eyes.
10. Put a small amount of blush on each cheek.

Wednesday, September 24, 2008

Yes, Virginia, There is a Santa Claus

Dear Editor—
I am 8 years old. Some of my little friends say there is no Santa Claus. Papa says, “If you see it in The Sun, it’s so.” Please tell me the truth, is there a Santa Claus?
Virginia O’Hanlon


Virginia, your little friends are wrong. They have been affected by the skepticism of a skeptical age. They do not believe except they see. They think that nothing can be which is not comprehensible by their little minds. All minds, Virginia, whether they be men’s or children’s, are little. In this great universe of ours, man is a mere insect, an ant, in his intellect as compared with the boundless world about him, as measured by the intelligence capable of grasping the whole of truth and knowledge.

Yes, Virginia, there is a Santa Claus. He exists as certainly as love and generosity and devotion exist, and you know that they abound and give to your life its highest beauty and joy. Alas! how dreary would be the world if there were no Santa Claus! It would be as dreary as if there were no Virginias. There would be no childlike faith then, no poetry, no romance to make tolerable this existence. We should have no enjoyment, except in sense and sight. The eternal light with which childhood fills the world would be extinguished.

Not believe in Santa Claus! You might as well not believe in fairies. You might get your papa to hire men to watch in all the chimneys on Christmas eve to catch Santa Claus, but even if you did not see Santa Claus coming down, what would that prove? Nobody sees Santa Claus, but that is no sign that there is no Santa Claus. The most real things in the world are those that neither children nor men can see. Did you ever see fairies dancing on the lawn? Of course not, but that’s no proof that they are not there. Nobody can conceive or imagine all the wonders there are unseen and unseeable in the world.

You tear apart the baby’s rattle and see what makes the noise inside, but there is a veil covering the unseen world which not the strongest man, nor even the united strength of all the strongest men that ever lived could tear apart. Only faith, poetry, love, romance, can push aside that curtain and view and picture the supernal beauty and glory beyond. Is it all real? Ah, Virginia, in all this world there is nothing else real and abiding.

No Santa Claus! Thank God! he lives and lives forever. A thousand years from now, Virginia, nay 10 times 10,000 years from now, he will continue to make glad the heart of childhood.

Monday, September 22, 2008

Christmas Cookie Swap Meet

Step 1
Grab your pen and paper and jot down who you would like to call and invite them to come to your Cookie Swap. This is an opportunity for them to share their favorite recipes and bring their own homemade baked Cookies. Encourage them to also bring the recipes to the Cookies they are bringing to the Swap. Keep track of who is coming and what they are bringing. Be sure to set a specific date and time. Don't forget to send out Invitations to those who you couldn't personally invite.

Step 2
Create individual Goodie Bags to hold all of the guest's Cookies. Medium sized paper bags work fine. Use your pen to personalize each bag with the name of each guest.
(You could also use tins, boxes or whatever you can imagine)

Step 3
On the day of the swap, be sure to have several copies of your favorite recipes on note cards displayed near the plate of the Cookies you just baked.

Step 4
Be sure that every guest is happy and takes home a variety of Cookies

Crochet Christmas Baubles

Crochet Christmas baubles
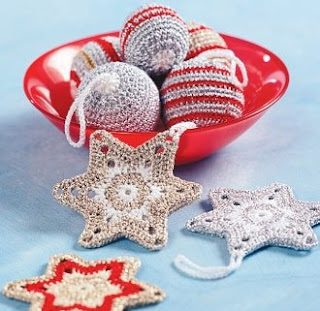


Crochet baubles
Finished sizes: about 13cm in circumference (small bauble); about 16cm in circumference (large bauble)
Gather your supplies
Pellicano Perle No 5 mercersied cotton in White 7901 and Ecru 0608; Arista in Red 318, Soft Gold 303, Silver 301 and Soft White Gold 302; 2.00mm crochet hook; tapestry needle; scissors; 38mm and 50mm polystyrene balls

Tension: Check your tension before you start. If your tension sample is larger than recommended, use a slightly smaller hook. If your tension sample is smaller than recommended, use a slightly larger hook. Small bauble: Crochet first 3 rnds of pattern. Sample should measure about 3.3cm in diameter. Large bauble: Crochet first 4 rnds of pattern. Sample should measure 4.5cm in diameter.

Notes: When working on a new round, always crochet over thread ends. This saves time on threading ends in later. Tie a small knot at the end of Arista thread to prevent it from unravelling.

The beginning, 1st and 18th Rnds are all made using Pellicano. Rnds 2-17 are made using Arista. If you are making striped baubles, simply finish off thread at the end of the round and use another colour for the next round (join new thread to a stitch from previous round using a slipknot). The instructions will only tell you to finish off thread when changing from Pellicano to Arista thread but you may wish to finish off and swap colours at the end of any row.

Rounds 2, 3, 4, 15, 16 and 17 are made using htr stitches and therefore the stripes will be quite wide. Rounds 5, 6, 7, 8, 9, 10, 11, 12, 13 and 14 are made using dc stitches (if you would like your stripes to be even in width, work 2 rnds of dc stitches in the same colour to make the stripes similar in width to the htr stripes).

If you are choosing to continue crocheting in the same colour of Arista, disregard the 'joining a new colour' instructions.

Make sure when working the rounds that you do not crochet into the slip stitch from the end of the previous round.

Refer to crochet stitch diagrams and abbreviations by
clicking here

Here's how
Begin with Pellicano in colour of choice, make 5ch. Join with sl st to form a ring.
1st Rnd: 2ch (represents 1st htr), 11htr in ring, sl st in 2nd of 2ch from beg of rnd. Finish off Pellicano.
2nd Rnd: Using Arista thread in colour of choice, join thread to a htr of previous rnd using a slipknot. 2ch (represents 1st htr), htr in same st, 2htr in each htr to end, sl st in 2nd of 2ch from beg of rnd.
3rd Rnd: Using Arista in colour of choice, join thread to a htr of previous rnd using a slipknot. 2ch (represents 1st htr), 2htr in next htr, *htr in next htr, 2htr in next htr, (repeat from * to end of rnd), sl st in 2nd of 2ch from beg of rnd.
4th Rnd: Using Arista in colour of choice, join thread to a htr of previous rnd using a slipknot. Small bauble: 1ch (represents 1st dc), dc in each htr of the previous rnd, sl st in 1ch at beg of rnd. (36dc made in rnd, including counting the 1ch at beg as 1st dc).
Large bauble: 2ch, (represents 1st htr), htr in next htr, 2htr in next htr, *htr in next 2htr, 2htr in next htr, (repeat from * to end), sl st in 2nd of 2ch from beg of rnd (48htr in rnd, including counting the 2ch at beg as 1st htr).
5th, 6th 7th, 8th, 9th, 10th, 11th, 12th Rnds, small bauble only: Using Arista in colour of choice, join thread to a dc of previous rnd using a slipknot. 1ch (represents 1st dc), dc in each dc of the previous rnd, sl st in 1ch from beg of rnd. At the completion of the 12th rnd, insert the foam sphere into the crochet and begin crocheting rounds 13, 14 and 15 over the top of the foam sphere.
5th Rnd, large bauble: Using Arista in colour of choice, join thread to a htr of previous rnd using a slipknot. 1ch (represents 1st dc), dc in each htr of the previous rnd, sl st in 1ch at beg of rnd (48dc made in rnd, including counting the 1ch at beg as 1st dc).
6th, 7th, 8th, 9th, 10th, 11th, 12th, 13th and 14th Rnds, large bauble: Using Arista in colour of choice, join thread to a dc of previous rnd using a slipknot. 1ch (represents 1st dc), dc in each dc of the previous rnd, sl st in 1ch at beg of rnd. At the completion of the 14th rnd, insert the polystyrene ball into the crochet and begin crocheting the following rnds over the top of the ball.

Shaping top of baubles
Note: In the 13th Rnd of small bauble, the 15th Round of large bauble and in following rounds of each, make 2htr tog in a cl to decrease at top of bauble. (In 13th rnd of small bauble and 15th Rnd of large bauble, you will be crocheting into the dc stitches of the previous rnd. In following rnds, you will be crocheting into the htr stitches or htr cl stitches of the previous rnds).

To make 2htr tog in a cl to decrease: wrap thread around hook and insert hook into 1st stitch, wrap thread around hook and draw thread back through this stitch (there will be 3 loops on hook). Wrap thread around hook and insert hook into next stitch. Wrap thread around hook and draw thread back through this stitch (there will be 5 loops on hook). Wrap thread around hook and draw through all
5 loops on hook.


13th Rnd, small bauble only: Using Arista, join thread to a dc from previous rnd using a slipknot. 1ch, htr in next 2dc, *make next 2htr tog in a cl to decrease, htr in next dc, following the instructions above, repeat from * to end, sl st in 1st htr at beg of rnd.
14th Rnd, small bauble only: Using Arista, 1ch, htr in next st, *make next 2htr tog in a cl to decrease (repeat from * to end), sl st in 1st htr from beg of rnd (miss 1ch made at beg of rnd). Finish off Arista.
15th Rnd, small bauble only: Using Pellicano, join thread to the 1st htr from beg of previous rnd. 1ch, htr in next htr cl, *make next 2htr tog as a cl to decrease (repeat from * to end), sl st in htr at beg of rnd (miss 1ch made at beg of rnd). Finish off Pellicano. Follow instructions to make hanger.
15th Rnd, large bauble only: Using Arista, join thread to a dc from previous rnd using a slipknot. 1ch, htr in next dc, htr in next 2dc, *make next 2htr tog in a cl to decrease (following the instructions above), htr in next 2dc (repeat from * to end), miss 1ch from beg of rnd, sl st in 1st htr at beg of rnd.
16th Rnd, large bauble only: Using Arista, join thread to a stitch from previous rnd using a slipknot. (In this and following rounds you will sometimes be crocheting into htr stitches and sometimes crocheting into cluster stitches made in previous rnd. These instructions, therefore, ask you to crochet into the next st, rather than specify what that stitch will be. ) 1ch, htr in next 2st, *make next 2htr tog in a cl to decrease, htr in next st (repeat from * to end), miss 1ch made at beg of rnd, sl st in 1st htr at beg of rnd.
17th Rnd, large bauble only: Using Arista, 1ch, htr in next st, *make next 2htr tog in a cl to decrease (repeat from * to end), miss 1ch made at beg of rnd, sl st in 1st htr from beg of rnd. Finish off Arista.
18th Rnd, large bauble only: Using Pellicano, join thread to the 1st htr from beg of previous rnd. 1ch, htr in next htr cl, *make next 2htr tog as a cl to decrease (repeat from * to end), sl st in htr at beg of rnd (miss 1ch made at beg of rnd). Finish off Pellicano.

Hanger
Attach Pellicano to a stitch from the last rnd using a slipknot. Make 40ch, sl st in the top of the bauble in the last rnd. Finish off by weaving in all threads.


Saturday, September 20, 2008

Make a Footprint Ornament


Prints of their precious little feet become a perfect memento ornament for baby. Use scrapbook paper as a background and embellish with a ribbon border.

What You Need
Baby's footprints
Two pieces of light-colored scrapbook paper
Silver card stock with satin finish
Paper glaze such as Aleene's Paper Glaze
Paintbrush
Scissors
Embossing stylist tool
Two-sided adhesive foam dots
Double-sided tape
Crafts knife
Access to computer/printer/copier or letter stickers
3/8-inch-wide ribbon
2 silver rondelle beads

How to Make It
Copy an image of baby's footprints onto a piece of light-colored scrapbook paper. Brush two coats of paper glaze onto the scrapbook paper, allowing drying time in between. (This will protect the paper from fingerprints and dust, etc.)

Cut out the paper footprints. Cut a square of colored scrapbook paper large enough to display the footprints. Cut a slightly larger square of silver card stock. Turn silver paper over and lay it on a soft surface such as a piece of craft foam or cardboard. Using a stylist tool, make dot impressions around the edge of the square.

Apply foam dots (two layers) to the back of footprints. Apply footprints to square of colored scrapbook paper. Apply paper square to square of silver paper using double-sided tape.

The next step can be done two ways:

Option 1: Cut out a square of scrapbook paper larger than the silver card stock. Adhere it with double-sided tape and apply adhesive letter stickers for the birth information.

Option 2: Print directly onto the paper using a computer and printer paper. Create a document and type in the middle of the document page the birth name and birth date. Print it out in portrait mode. Next create another document; type in the birth length on one page and the birth weight on another page. Feed the birth name, birth date page back into the paper feeder so the birth length will print on that page. Then feed the same page through again so the birth weight will print on it as well. This takes a little practice to line up the words. Trim the paper into a rectangle and adhere it with double-sided tape to the silver paper.
Using a crafts knife on a protected surface, cut two small diagonal slits in the top two corners of the ornament. Cut one end of the ribbon on a diagonal and feed it through the slit from back to front. Thread one rondelle bead through the ribbon. Tie a knot in the ribbon and feed the loose end back down through the bead and through the second slit to the back. Repeat for the other side.

Wednesday, September 17, 2008

Tree Decorating

Well I just saw the coolest idea for decorating my tree. I'm going to try it this year, I just got to buy the dove's first.

Hang doves from the ceiling with strings of beads in their mouths as though they were flying in and decorating the tree. Use white thread to suspend the birds and pushpins to secure them to the ceiling. The beads are going to be attached to the birds’ beaks with hot glue or with straight pins. They can also be attached to the feet. The string of beads should be long enough to drape the end over a limb of the tree. Place the doves at different distances from the Christmas tree. The end result should look like the doves are decorating the tree with beads. Also I'm going to have one or two of the doves carrying Christmas ornaments attached to their feet as if they were flying in to place the ornament on the tree.

Here's an example...but when I get mine done I'll post it.

Create a Holiday Gift Container

Create a Folgers Holiday Gift Container

The Correct Way The Post Office Would Like You To Address Envelopes

Forget everything your fourth-grade teacher told you about flowing capitals and indented addresses. Here is how the Post Office would like to see your cards addressed:

MR AND MRS STEPHEN EWER
P O BOX 1234
ANYTOWN WA 98765-4321

The rules are:
(1) use block capital letters,
(2) do not use periods or commas,
(3) use proper postal abbreviations and (4) use the nine-digit zip code, if you know it.
Missing Zip codes? The Internet makes it easy. Find the USPS Zip Code Locator at http://zip4.usps.com/zip4/welcome.jsp .
Get a list of state and addressing abbreviations at http://www.usps.com/ncsc/lookups/usps_abbreviations.htm.

Today's software can often go a step further and add a postal bar code to the envelope or label, but CEO hesitates to raise the ire of the Purists to quite that extent. Let's just say if you're on the Geek Cool side of the fence, it's a nifty touch, and the Postmaster will thank you.

Tuesday, September 16, 2008

Time to write out that Christmas card list

Today I'm going to write out my christmas card list. Instead of racking my head after Thanksgiving and being in a hurry, my cards will be ready to be mailed out the first of December!

Get Free Gifts By Searching The Web!